Engine Modifications
Here's where there's a lot of grinding to be done to the block to get the transaxle to fit. The block and oil pan have to be ground out about 15mm. There is not much left of the lip on the top of the oil pan, but there is enough to be taken up by RTV Silicone. Just put a lot more in that area when assembling the oil pan to the engine. Below are a few pics of how much has to be taken out. The transfer case can be ground a bit to leave a bit more of the block/oilpan intact.


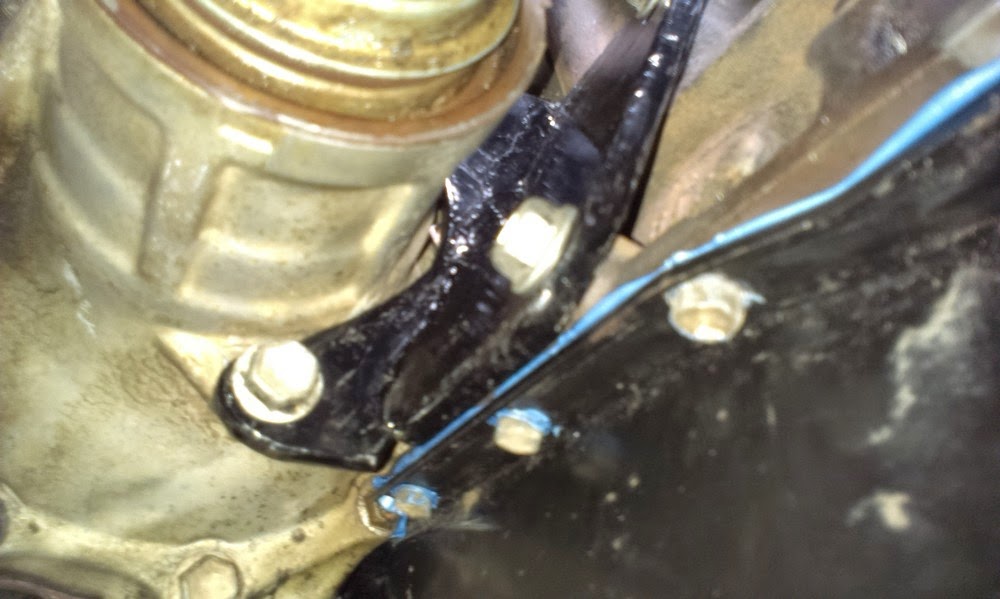
Here's assembly of the transfercase/transaxle & engine as well as a fabricated bracket with drawing to connect the transfer case to the engine. This bracket may not be needed, but the 3S-FE had a bracket to connect the transfer case to the engine so figured I'd fabricate my own. You'll need to grind off the little nib on the engine to fit this bracket.


Exhaust Manifold Mods
The rear manifold collides with the transfer case so the front manifold has to be used on the rear cylinder bank. this positions it so that the exhaust header can route down under the transfer case with enough clearance using a 40NB long radius welding elbow. You could probably use a donut to get the tight bend radius as well. The manifold then needs a plug welded into it for the EGR assuming you're still going to use it.


Above also shows the engine mounted into the Rav4 subframe.
Hi there your write up is awesome...currently doing a 4vzfe into gen2 camry alltrac...what did you do for powersteering? v6 pump or rav4 pump? any pics of your rear bank exhaust...thanks jason
ReplyDeleteHi Jason, Thanks, I put up as much info as I could. I used the Rav4 power steering pump as there was only a couple millimetres clearance between the pump and the exhaust shield. The camry PS pump has an extra pump chamber to operate the cooling fan so was way to big to fit in the space. I had to choose a size belt that would make the pump swing as far away from the exhaust to achieve as much clearance as possible. The above pic (second to last one) shows the rear exhaust bank header with EGR welded into it. I'll do another post in the next day or two showing the power steering pump and rear exhaust header viewed from under the car.
ReplyDeleteHi,
ReplyDeleteThis is a great blog! Any chance we could email back and forth? If not, do you know if the Rav4 e250f transfer case will bolt up to an e153 awd transmission from an st185 Celica?
Id prefer you post your questions here as others may find them useful. From what i can tell the only difference between the celica and rav transfer cases are the size/weight and gear ratio. It should bolt up no worries. The rav transfer also has the centre diff lock collar which you probably need to remove when installing on the celica box as the celica centre diff dosent have the spline for this collar to slide over. Rav transfer case should be good up to 200kw. Celica in excess of 300kw. Ive found that the rear diff on mine is wearing out with the 140kw im pushing through it, but that includes a decent amount of 4wd'ing in 1st gear @5krpm in sand so thats a lot of torque going through it.
ReplyDeleteThanks for the reply.
ReplyDeleteI am planning to use the st185 trans, Rav4 center differential and St185 rear unless I can find an LSD rear that will fit that has the same ratios?
Are you saying that the differential ratios are not compatible between the St185 trans and the Rav4 center differential? For some reason I thought the front and rear differential ratios were determined inside of the st185 trans itself and not the center differential? I am really hoping the Rav4 differential will hold more than 200kw or I am in trouble.
I was also thinking the locking center differential would be advantageous to drag racing? What do you think?
look at the pics under "E53 Transaxle reassembly" - Pics 5 & 9. See how there are 3 shafts. inner shaft is for right front wheel. Mid shaft is to drive the transfer case (output from centre diff to rear wheels). Outer (course spline - output from centre diff to front wheels) is what the centre locking collar slides over to lock the mid & outer shafts together. The Front & Centre differentials are within the same casing within the gearbox. The celica dosen't have this outer course spline so can't have the centre diff locking.
DeleteThe only way that you could have centre diff locking is to pull the gearbox apart as I have done, and swap out the celica front-centre differential with the rav's. this would mean taking the ring gear off like i did as the ring gear won't be the same.
Above I was talking about the rear diff & transfer case - I've read that the rear diff is weak, and the transfer case on the rav is smaller & lighter than the celica so I bet both transfer and diff are not able to take too much torque. As far as ratios go, the transfer case and rear diff have to match. If not, then you'll have more drive to the front or rear depending on which gear ratio is higher. This will work fine as long as the centre diff is not LSD, otherwise the front and rear wheels will be trying to lock at high speed which isn't good with different ratios.
Cheers.
I see exactly what you are referring to and I do not want to pull the box apart, so I guess my only option is to bolt the Rav4 case on or try and fit the GT4 transfer case which will be quite a pain with the space. I do plan to use an St205 rear for strength and for the LSD.
ReplyDeleteDid you try any other transfer cases or do you have any other ideas? I'm open to any ideas. Thanks
I'm not sure how much bigger the GT4 tranfer case is but I've heard it's a fair bit bigger. alternatively you may be able to get hold of the later model V6 rav transfer case. again the ratios may be different though. I'd be trying as hard as you can to get the GT4 transfer case to fit if you can. I've had to make some fairly decent modifications to make the V6 fit in the rav's engine bay, but i'm glad I didn't compromise on anything now and just made it fit.
ReplyDeleteHello ST,
ReplyDeleteLove your blog, I'm currently doing a 1MZ-FE swap into my Rav4, your blog inspired me. What did you do for your gearbox sandwich plate?
I'm sure I'll have more questions as I step through it.
I'm currently up to mounting the 1MZ-FE to the Rav4 gearbox.
Regards,
Andre
No Sandwich plate (faceplate) required. the 3vz bolts straight up to the rav gearbox using the original bolt holes - the 1MZ should do the same. I don't think you'll need to grind the block as much to make space for the transfer case with the 1mz either.
DeleteThanks heaps, I'm going to keep attacking this and hopefully finish it soon. The big cylinder thing on the gear box with air lines going to it, what did you do with that? Did you retain it and what does it do? Is it the center diff lock?
DeleteYes Centre diff lock actuator. No it wouldnt fit because there is not enough space so left it out and put a bar to connect it permenantly off. I intend to eventually make a spring loaded over center lever and mount it under the dash somewhere with a cable going to the linkage bar so that i can manually engage the diff lock with the lever. Ill post it up here when i eventually get around to it. Ive actually found i havent needed it yet in the 4wd'ing ive already done without it.
DeleteThat's what I was assuming. What do you mean a bar to connect it permanently off? Any pictures? have you basically done a plate to blank it off?
DeleteSorry no pics. You will see when you remove the actuator that it connects to a lever that goes inside the transfer case. You will need to have something that holds this lever in a position that has the centre diff lock disengaged, otherwise the diff lock could engage while driving. I made up a bar that connects to this lever and the engine block.
DeleteOkay thanks heaps, I'll have a look at this tonight. If I come up with a good solution I'll take pictures and send them your way if your interested?
DeleteIs a spigot bearing adaptor required?
ReplyDeleteNo, assuming it's manual, you need a 3vz or 1mz manual flywheel. Or re-drill existing flywheel to suit the 1mz. auto im not sure.
ReplyDeleteYes I bought a manual flywheel, I was given a manual wiring loom as well, I still have the donor Avalon in my yard to for any more parts I may need off it. I'm going to continue working on it tonight, was going to over the weekend but I was busy with my daughter.
DeleteYou may be able to use the rav pressure and clutch plate, otherwise just buy a new camry clutch kit as i did (is compatible with the rav gearbox). The Rav clutch and pressure plate are lighter so you may find it might slip a bit at WOT.
DeleteThe clutch plate and pressure plate from the Rav4 bolt up perfectly fine. I have a heavy duty Excedy clutch as the Rav4 was turbo before this conversion started.
DeleteSo far it's not looking like I'm going to be able to mount the gearbox with the transfer case, even after grinding. I'm guessing that the physical size of the 1mz-fe is just much bigger then the 3VZ-FE. Anyone thinking of doing a 1MZ-FE swap you might want to hold off.
DeleteI'm looking into other options and I'm going to try a few more things to see if I can get the transfer case to work with the engine.
I'm kicking myself at the moment as it's a lot of time and money wasted if this doesn't work.
Ok, The transfer case for the Rav4 is your only option. I'm unsure if the ratio's will match then with your rear diff.
DeleteI'm following this project for some time know. any new developments or i there a web site or blog to see the finished product? http://www.cardomain.com/ride/400637
ReplyDeleteStill working on it one thing at a time. Will post some more of what I've done recently.
DeleteCheers.